Showing posts with label Cook Once - Eat Twice. Show all posts

Friday, May 15, 2015

Smokehouse Lasagna


Smokehouse Lasagna ... just that name of it makes my mouth water.
I mean, just the word 'lasagna', well, it is strong enough to stand alone ... no embellishment needed, right?
But add 'smokehouse' to it, I am all ears!


This was my first time to make Smokehouse Lasagna,
but I've been making Smokehouse Spaghetti for years.
It's one of our very faves.
Again, it's the name that got me.
This time around though,  I just had a hankering for lasagna.
So, I adapted this recipe very easily & now we've got 2 favorites!


My good ol' Amish cookbook is where this recipe comes from.
I love this cookbook {it's my go-to}.


Nothing too crazy in the way of ingredients ... the usual lasagna fare with the exception of one thing 
& we are about to get to that ;)


That's right:  BACON!


The bacon is what makes it SMOKEHOUSE LASAGNA!


After frying the bacon & the ground beef together {& draining},
the sauce is added in & the lasagna assembly begins.


And cheese.
Did I mention there is A LOT of cheese in this recipe?
You may have noticed, there are 4 kinds of cheese in this dish!


And no lasagnas were ever harmed by adding a few pepperonis to the top.


This is one massive pan of lasagna.
I'm glad I had this disposable pan on hand cause I'm pretty sure 
it might have otherwise overflowed.


I sprinkled some of this seasoning over the top & stuck it in the oven.


And here it is ... in all it's smokehousey glory!


This is one delicious treat, let me tell you.
My family gobbled it up, leaving 1.5 pieces to spare.

 
Next time you are in a lasagna mood, do yourself a big favor & give this recipe a try.
Pin it on Pinterest so you'll know just where to find it.
You can even share it on your FB page if you want.
Something this awesome oughta be shared, right?!
;)


Smokehouse Lasagna

1/2 lb. bacon
2 lbs. ground beef
1 small onion, chopped
2  24 ounce jars pasta sauce
3 cloves garlic, minced
1 tsp. salt
1/2 tsp. pepper
9 lasagna noodles
15 ounces ricotta cheese
12 slices of provolone cheese
5 ounces grated parmesan cheese
1 lb. mozzarella cheese
sprinkle of dried rosemary & garlic (any italian seasoning will work)
25 slices of pepperoni

Fry bacon, ground beef, & onion together.
Drain off excess fat.
Add in pasta sauce, garlic, salt, & pepper, stirring well to combine.
Simmer for  20-30 minutes.

Meanwhile, prepare lasagna noodles as directed on package.

In a large, deep dish, begin assembling lasagna by putting a layer of meat sauce on bottom.
Next, put 1/3 of noodles, 1/3 of sauce, 1/3 each type of cheese.
Repeat layers twice.
Top with pepperoni & dried rosemary & garlic seasoning.

Bake at 350 for 30 minutes, uncovered.
Cover with foil & bake for an additional 15 minutes.
Let stand for 10 minutes before serving.


*additional recipe notes:
The original Smokehouse Spaghetti recipe does not use jarred pasta sauce.
I will share the homemade sauce ingredients when I share the spaghetti recipe.


Who doesn't love a good party?!
You can find me here linking up with these great blogs.

Monday           C.R.A.F.T    Amaze Me Monday  The Dedicated House
                     I Should Be Mopping the Floor     The Hankful House     The Modest Mom
Tuesday        A Delightsome Life    A Bowl Full of Lemons   So Much At Home
                                    Titus Tuesday  A Stroll Through Life
Wednesday   Raising Homemakers        Savvy Southern Style         Adorned From Above
                              The Thrifty Home   A Wise Woman Builds Her Home
Thursday    Between Naps on the Porch   Serving Joyfully    Katherines Corner   Lamberts Lately
Friday      Rooted in Thyme  The Thrifty Groove   Farm Blog Hop  Best of the Nest
                                French Country Cottage  The Girl Creative
Sunday    Nifty Thrifty Things  Sew Many Ways


Thursday, August 21, 2014

Steak & Chicken Fajitas


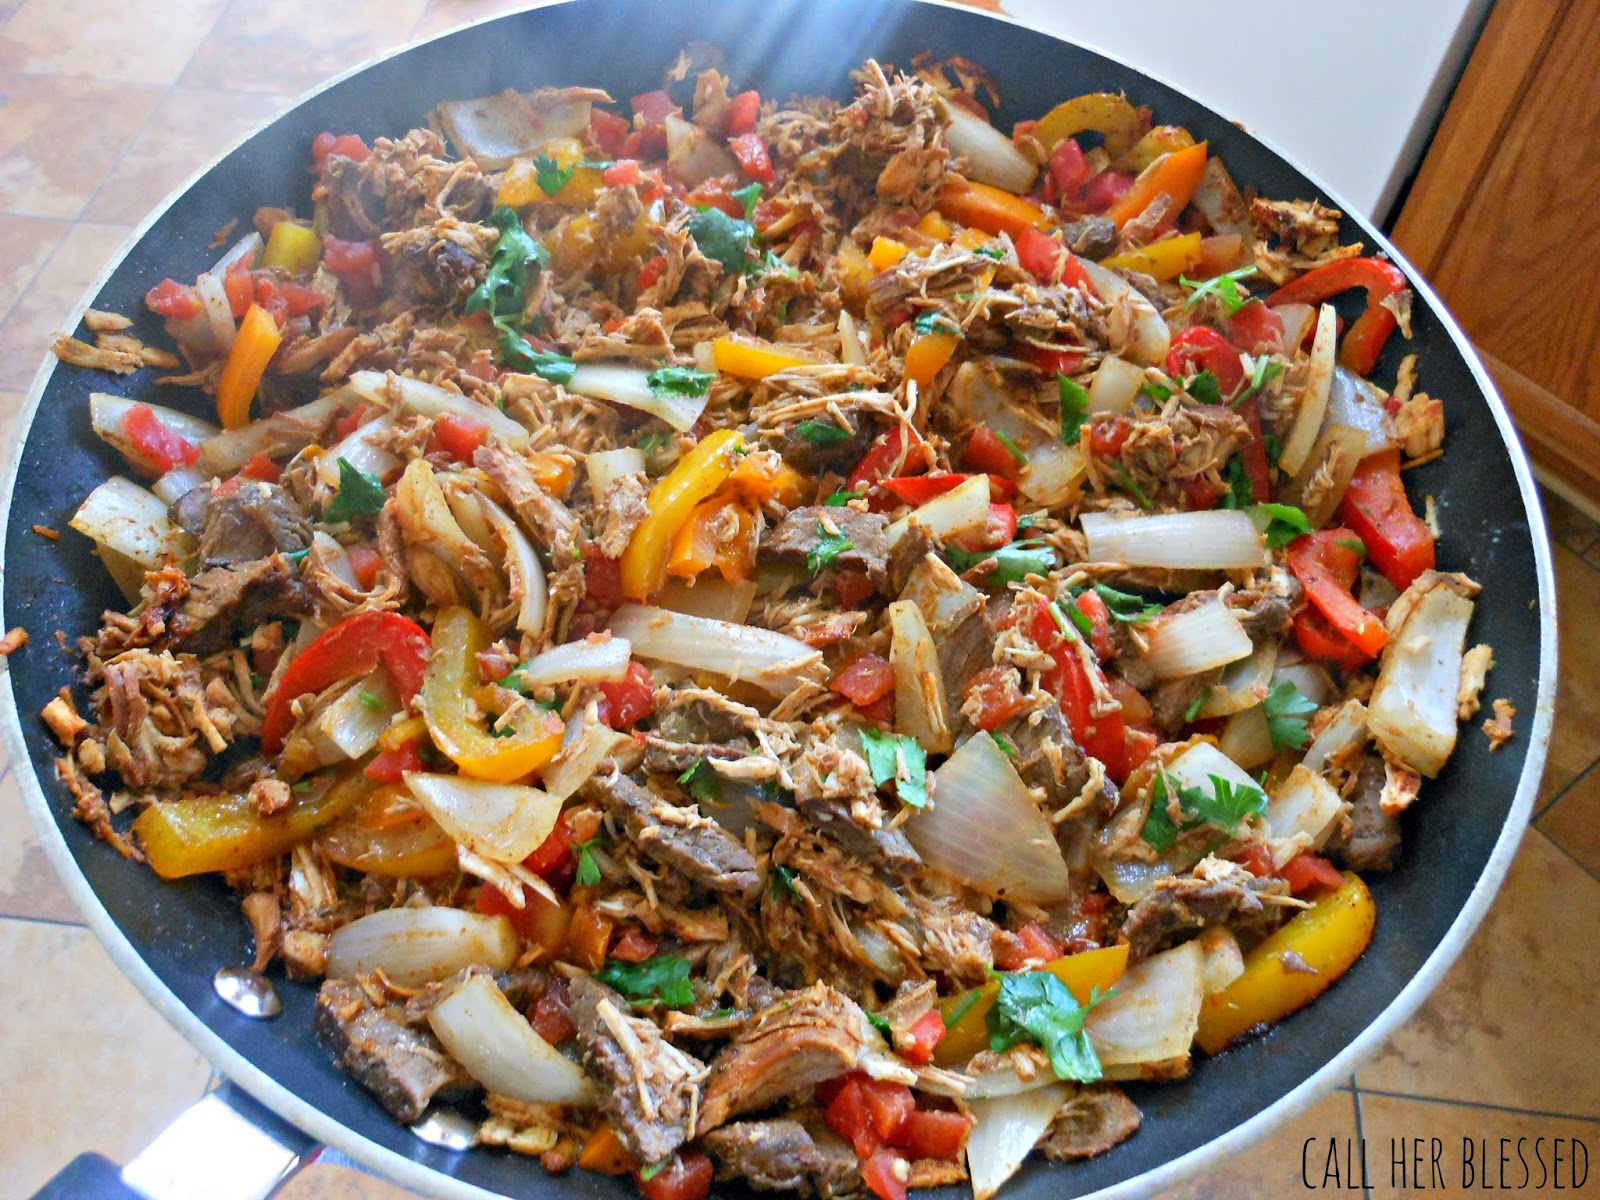
Is this not just about some of the prettiest fajita filling you've ever seen?!
I think yes!


I wasn't even planning to share this on the blog, 
but when they turned out looking so festive 
{& perfect},
I quickly grabbed my camera.
When they were equally as delicious, it was a done deal.
They are going on the blog, I said.
Plus, this will help me remember how to duplicate these the next time ;)


You see, I have to admit, although I've made fajitas more times than I could count,
{it's one of our faves!}
I just make them, well, however I'm in the mood to make them.
I don't follow a recipe & they've probably never been the same way twice.
You can do that with fajitas cause it's a pretty general recipe ...
meat {either steak or chicken or both}, peppers, onions, seasonings, fresh tortillas, & toppings.


I sometimes use a seasoning packet specifically for fajitas, but most often I don't.
I open up my spice cabinet & throw in a little of this & a little of that.
I may use fresh tomatoes, I may use canned.
There is usually some variation.
However, they were SO good this time that I may just make them like this every time from now on.


Here's another thing that I like about fajitas.
I love the 'cook once, eat twice' concept.
The chicken breasts I used in this meal were done in the crock pot the day before.
 All I had to do was to shred up the leftovers for this meal.
That helped me pull this together in no time.


So here are the ingredients I used:
  • steak & chicken {about 3 pounds total}
  • peppers & onions {I used 1 red, 1 yellow, & 1 onion}
  • cilantro {a lot - we love it - minimum a 1/2 cup chopped}
  • 2 cans diced chili-ready seasoned tomatoes
  • 1 jalapeno, seeded & chopped 
  • 1 lime

For the seasonings I used:
  • 2 Tbsp. Worchestershire sauce
  • 1/2 tsp. salt {or to taste}
  • 1/4 tsp. pepper
  • 2-3 Tbsp. chili powder
  • 2-3 Tbsp. garlic powder {or 6 cloves minced}
  • 1 Tbsp. cumin
  • 1/2 tsp. onion powder
  • 1/2 tsp. dry chicken soup base


Saute steak & chicken in 2 Tbsp. olive oil 
{steak according to your preference & chicken until no longer pink inside}.
Since my chicken was already cooked, I just shredded it & tossed it in with the steak when it was done.
After both meats are in the pan, pour on the seasonings!
This is what really makes a fajita, in my opinion ... the seasoning.
Stir together, making sure all the meat is coated 
& then toss in all the chopped veggies & the canned tomatoes.
{Lots of additional flavor comes from the spicy tomatoes.}
Reduce heat to medium & cover for a few minutes.
The veggies need to soften just a little bit.
Right before serving, squeeze a whole fresh lime {or lemon} over the fajita mixture in the pan.
This adds a bright punch of flavor at the end.


Fill the warm tortillas {I usually serve flour & corn} with the fajita mixture & top with shredded cheese.
Each person can add any additional topping they'd like:
sour cream, avocado, diced onion, lime/lemon, salsa, shredded lettuce, cilantro, etc.


This is a relatively quick meal that's authentic tasting & pretty healthy, to boot.
It's also a great meal for leftovers ... just as good the second day.
For variation, I like serving the fajita mixture over a toss salad.
Top it with ranch dressing & tortilla strips/chips & you've got a delicious southwest-style salad.


Now, get in the kitchen & cook =)


Monday, October 15, 2012

Comfort Food: Beef Potpie


This is delicious, comfort food at it's beefy best!
It's quick to put together especially if you use the "Cook once, Eat twice" method that I so love!

It's basically this:  If you are using the crock pot, throw in 2 roasts instead of one ...
or double the chicken you need for your recipe to use for the next day's meal.
If you are using the oven, do the same.
Bake off twice the amount of meat while the oven is hot & save the rest for meal #2.
We love to grill out a big bunch of boneless, skinless chicken breasts to use throughout the week.
This method saves time & money ... what's not to love?!

Ok ...so back to the Beef Potpie recipe.

Here are the ingredients you need:
  • 1 beef roast, approximately 2 lbs, cooked & shredded
  • 1 1/2 - 2 cups of reserved beef broth, cooled
  • 1 box ready-to-bake pie crust {use both crusts}
  • 2 cans mixed veggies, undrained
  • 1 can peas, undrained
  • 1 can carrots, undrained
  • beef bouillon cubes
  • 1/4 c. cornstarch
  • black pepper


In large pan, add all the canned veggies, 2 beef bouillon cubes, & a generous sprinkling of pepper.
Cook this until liquid is almost gone & veggies are tender {approx. 15 minutes}.


Add in shredded beef.


Stir to combine.


In mixing bowl, combine approx. 1/4 cup of cornstarch to cooled reserved beef broth
& wisk thoroughly making sure there are no lumps.

*I forgot to snap a pic of this step, so this lovely yellow cornstarch container will have to do.
Talk about keeping it 'real' ;)
{BTW, I HATE the feel of cornstarch!  Soo glad for these containers instead of the boxes!}


Pour the broth mixture into the veggies & meat & stir to combine.
Transfer to a 9x13 baking dish.
It will fill it to the top.
Now, if you want to go more of a rustic, homey style with this dish, just lay the pie crusts on the top,
somewhat overlapping, & stick it in the oven.
This also translates to 'didn't have time to make it all 'Pinteresty' looking, just trying to get food on the table!'
Needless to say, I chose the rustic approach with this recipe.


But, if you wanted to get all fancy, you could cut the pie crust into strips & weave them together
for a really pretty looking Beef Potpie.
These ready-made crusts are very versatile.
Either which way you choose, it needs to bake for 12-15 minutes on 450, til golden on top.


Ah, yeah ... a rustic comfort dish that's warm & hearty.


Next time you are making a roast in your crock pot, throw in some extra so you can make this dish.
As with most of my recipes, there's no exact science ... more of a method.
So, change it up some, if you like.
Use fresh veggies if that's your preference.
Leave out the peas if you like ... or add in onion.
You could even half the recipe & bake it in an 8x8.
You get the gist.
Just try it out.
It's definitely one I'll be making through the cold season.

Here are some additional recipes using the "Cook once, Eat twice" method:
Corn Chowder with Potatoes & Ham
Beef Brisket in the Smoker
Beef Brisket Tacos w/homemade Pico de Gallo


Blessings~

Tuesday, July 12, 2011

shredded beef brisket tacos w/homemade pico de gallo

As promised in yesterday's post, I wanted to show you how I turned leftover
smoked beef brisket into another meal!
This 'cook once, eat twice' dinner was so delicious ... & tasted so authentic
that for a second there, we almost thought we were south of the border ...
especially since we had Mexican music playing. 
Seriously.

OK, so the pico de gallo, well, that just put this meal over the top!
Let's start with that first cause it looks so pretty in my pic!


Told ya!
Isn't this gorgeous?!
It's super simple to make.
You need a few firm tomatoes, 1 small onion, 3 jalapeno peppers, cilantro, lime juice, and salt. These quantities are approximate ... you might need to increase or decrease the numbers, depending on the size of the vegetables you find, or less peppers if you don't like things too spicy.
Dice up all the veggies, squeeze on the lime juice & sprinkle with salt.

I used a mix of red & yellow tomatoes ... ya, that took the wow factor up a notch or 2;)

Now to the tacos.
Here are the ingredients you'll need:


                                                        And a beef brisket, of course!


Shred it up with a knife & fork into bite-size pieces.
Add in your seasoning & about 1/2 cup of water & mix together.
Simmer for 15-20 minutes for meat to absorb all the flavors.
Lastly, toss in some chopped cilantro & 1/2 cup diced onion.


And...Ole! DINNER IS SERVED!


Muy bien, if I say so myself!

Monday, July 11, 2011

Beef Brisket in the Smoker

James decided to pull out his smoker.
He loves that thing.
He smoked his favorite, a beef brisket, & for the 1st time, he smoked 2 whole chickens.
That's now my favorite.


Oh my, that's a LOT of meat!
Carnivores ... eh, you could say that.


He likes to refer to himself as 'Famous James'


Look at that purty lil' chicken!

There are 5 of us, but I still knew we'd have plenty left-over.


We like having left-overs though & I love being creative with them.
The whole 'cook once, eat twice' method is super!
Only with this amount of meat, it was more like 'cook once, eat about 5 times!'

Here's how it all panned out:


1st meal {early lunch}:  smoked chicken, bread 'n butter & potato salad
2nd meal {late supper}: smoked beef brisket & baked beans
3rd meal {sent in lunchboxes the following day}:  shredded BBQ beef brisket sandwiches
4th meal {supper the next day}: shredded beef brisket tacos on corn tortillas
5th meal {lunch in lunchboxes the following day}:  tacos leftover from supper

You think they're tired of eating smoked brisket?
I think not.
James only smokes a brisket a few times a year, so they are more than happy to eat
on it a couple days.

Now, since the tacos were so divine ... & I made homemade pico de gallo for the 1st time
to serve alongside,  I'll share the recipe to both tomorrow.
Be sure & check back.

Wednesday, June 1, 2011

Chicken Bacon Ranch Sub

Our sons love Subway ...
& they have no trouble puttin' down a foot long in no time flat.
They all agree that the Chicken Bacon Ranch is their top favorite sandwich, so I knew
when I decided to try making one at home, they'd be all too happy to try it out.

Well, it was no disappointment!
James said it was 'restaurant quality' & the boys thought it was as good as,
or better, than Subway.
Hands down, it was a hit!


Often times, when James grills out, I have him throw on extra meat to use
the next day for another meal.
That's what I used for this sandwich.
I cubed up the leftover grilled chicken, sliced red & green peppers, & onion.
While I chopped the chicken & veggies, I had the bacon in the oven {375 for 15-20 mins.}


I used an extra long loaf of multigrain bread, plus another small loaf of sweet Italian bread,
both found on the markdown bread rack at Kroger.


After splitting the loaves of bread, I loaded on the cubed grilled chicken, bacon & topped
with cheese {I used muenster}.


Bake under broiler for 10-15 minutes, keeping a close eye on it.


After removing from oven, I topped with all our favorite ingredients:
onion, red & orange peppers, jalapenos, lettuce, tomato, mayo, & homemade zesty ranch.


Along side these delicious Chicken Bacon Ranch subs, I served potato salad & chips.
I will definitely be making these again!

Want the recipe for the homemade zesty ranch dressing?
Come back tomorrow & I'll have it posted.